
Here's one panto quilt I just finished up for my client Jane...the pattern is Scenic Bypass by Antler Quilt Designs. It measures approxmiately 86" x 66" and we used Deja Vu by Patricia E. Ritter and myself for the quilting, Glide thread in Light Olive, and one layer of Hobbs 80/20 batting.

Originally Jane had requested a deep purple shade of thread. I have a handful of purple thread on hand but none looked quite right so instead I suggested this pretty deep green to pull from the green in her fabrics, and also the green leaves on her backing fabric. I think it turned out so great, now I cannot imagine if we had used another color! I really like the blending look of the green in the lighter fabric, the only other shade I think would have looked equally as nice would have been a golden/honey color.

People often ask me what to use for their backings. My suggestion is generally a medium tone (unless your front is all very dark fabrics) that will look good with whatever color thread is going to be predominant on the front. I tend to use the same or similar shade thread in the top and bobbin, so you want something that will compliment the thread used to blend with the front. Many times folks like to send an all white or all dark colored backing - this is fine so long as there isn't going to be a lot of backtracking and you don't mind high contrast thread against it. No matter how impeccable my backtracking or how thin the thread, a couple of passes in white against navy blue is just not going to look as nice as a lighter blue. While the quality of the quilting is extremely important, I have really learned that color choice and quality of fabric matter just as much for the best possible outcome.

In the case of Jane's beautiful quilt, I think the green really worked beautifully with both the front and back of the quilt - she chose well! :)
Another recent finish that I have been itching to share is my client Michele's Gravity quilt! Michele is the cousin of my neighbor and I'm super excited about the quilts she is going to have me work on as she is a big fan of solids. To me that means I get to have some SERIOUS fun!

I had been just WAITING for someone to send me one of these! I'm not sure if just quilting it has satisfied my urge to make one or not...there never seems enough time to make all that I want to make, and because I really get my kicks from making and entering show quilts I'm not sure how soon I'll actually get to it. This certainly was fun to play on though!

We used one layer of Quilter's Dream Cotton Select for this one as this is Michele's batting of choice. We opted for Bottom Line thread in the top and bobbin in a light gray shade. Her backing was a black and gray print so much of the detail shows best on the front.

I just cannot get enough of those colors! There were a lot stretchy bias edge triangles to the outer edge of the quilt with this one but they did not give me much issue. Luckily much of the quilting allowed for me to pull and extra fabric in and (hopefully) we tucked it hidden pretty well. No pleats or tucks but some creative quilting happened here. :)


The Gravity quilt pattern (by Jaybird Quilts) measured approxmiately 96" x 95".
One more show and tell piece...this is Wanda's quilt. The center pattern is called a Stargello and she created it using a Stargello ruler tool - the borders were added by guild members to create one beautiful and awesome quilt!

This one was somewhere around 85" x 85". We used two layers of batting - I believe she sent Quilter's Dream cotton and I used a layer of Hobbs 80/20 overtop. This one I approached a little differently. I stitched in the ditch the entire quilt first. Then I went back and filled in. I have been hesitant to do that with quilts that do not have a significant amount of piecing in the past but I really think it made for a neater, crisper finish.
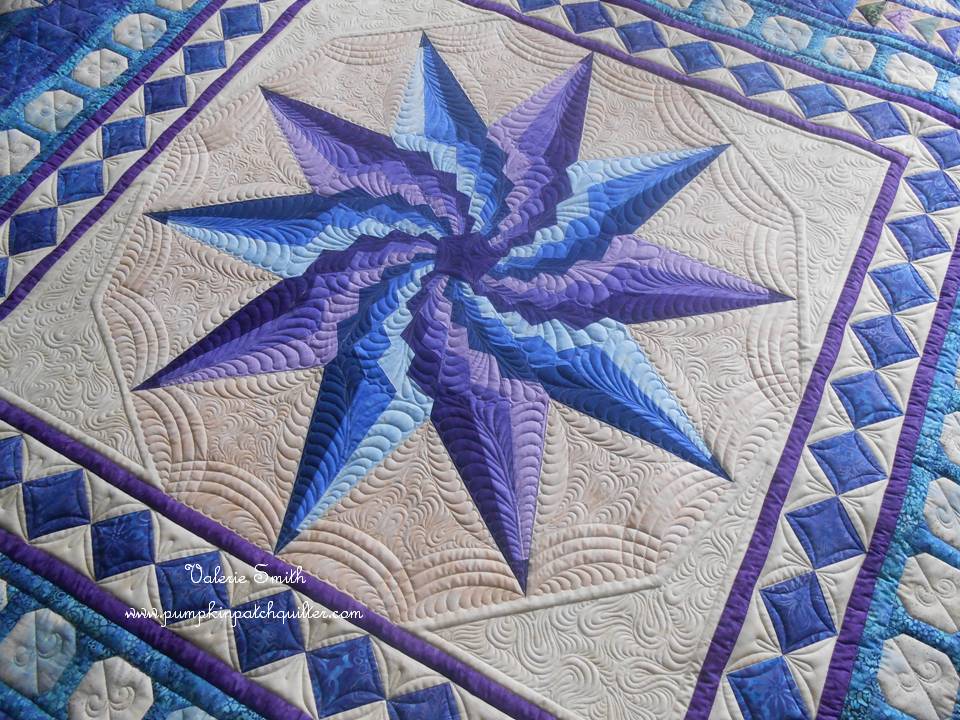
My favorite part is the quilting in this open space around the star...

I also really enjoyed quiltnig in the snowball border! The sort of curly cue design was something different but really effective I think.

The back is where I think stitching in the ditch prior to adding filler quilting really made a difference. If you look carefully the ditched lines show little to no backtracking - not because there wasn't any backtracking but because it was very little. Long continuous lines were done all at once in one long smooth motion - where as often when you ditch as you go, things don't always line up and look neat. The difference is small - but overall it really adds to the polished look of the quilting.


I think there are always things you look at after and say, "oh, I could have done that better or differently". I'm pretty pleased with this one!
I have been so fortunate to work on some very lovely quilts lately! I have started a new show quilt and I'll get to that in an upcoming post, along with some of my thoughts on MQX. I did not place this year but I'm happy to say I DID receive a teacher's ribbon from Angela Huffman! How exciting!
More to come...happy quilting!


