Saturday, January 29, 2011

Valentine's Day Finish

Taking a break from my more involved projects to make a few Valentine's decorations, and work on Baby Emma's quilt. Here's some shots of two little things I made...


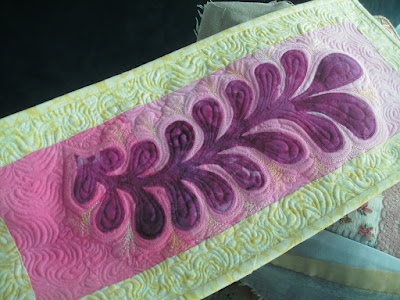
The little table runner below I made for my youngest's preschool teacher. She had surgery on her foot a few weeks ago and just returned this week, but is still recovering. I thought it would be a nice "welcome back".


My tension went a little crazy and and so my free motion got a little wonky in some spots, but I'm still happy with these. I haven't decided if I'm going to block them or not. Maybe the wallhanging I made for the door so it lies nice and flat.


This is the wallhanging for the front door - I thought it turned out cute! :) I experimented with a new technique on my binding too this time around. I couldn't believe I actually did it right the first try! I had always learned to tuck my binding into itself where you stop/start. Well that's easy and all but it creates a big bulky lump that is REALLY noticeable in little quilts. So I measured and cut the binding to exactly fit the quilt...and you can almost not even tell where it stops and starts! I will be doing that from now on, on all my bindings. What a difference!
Oh and yes...now that I'm looking at this picture, the wallhanging mini will be blocked. LOL* I see those corners are going every which way.

Wednesday, January 12, 2011

Pictorial Quilt Experiment


Ok, well this could turn out to be a total disaster, but I'm going to attempt a pictorial quilt. LOL* I am uber cheap and nearly out of printer ink so I just brought up a favorite picture I'd taken of my girls on my computer monitor and traced around some of the shaded areas. I think I'm going to run to Office Max and blow this up a bit, depending on how much that costs. Then play. I have no idea what I'm doing so be prepared for utter failer. Is it utter or udder? I think an udder is part of a female cows anatomy so we'll go with utter. ;)

Saturday, January 8, 2011

Woohee!! Almost done!!!

I was a very artsy kid growing up, I always thought I would go to art school and make a career of it. I remember as a kid doing a lot of sketching, and I used to love to show my parents all the progress I'd make on my drawings. My Dad used to say to me, "are you going to show me every line as you draw it?"

Now I'm all grown up and I have my very own little blog to talk about quilts until my hearts content...so the answer Dad? Yes. Yes I am. I am going to show you every stitch as I stitch it. I'm going to enjoy every moment of it too!!!

Here is my aqua compass that is looking less and less like a compass to me...but lookee there, we have a center!!! I decided after a few mishaps and many four letter words that I would just applique with fusible web that darn inner star...and you know what? I'm so happy I did. It may be not be a tribute to immaculate piecing but it looks half way decent and at this point that's all I'm concerned with.

What is it that they say? If it cannot be spotted by a man passing by on a galloping horse...let it be. Sounds like a good plan to me. ;)

Here is what I've finally decided is my goal in finishing this quilt. I had all sorts of plans and I played for HOURS in EQ with this design, and I'm thinking at the end of the day, less is more. I picked up some more purple fabric for the solid purple border which is going into the wash here in a few minutes, and then I'll get working on the geese. I'm not sure if I have enough auqua scraps but I was delighted to see that Jo Anns just got in a few new auqua batiks! Woohee!!! Looks like I have an excuse to do more shopping...

Here are a few fun progress pictures. I used that trapunto technique I learned from Patsy Thompson to make my little star pop. It looks kind of pretty from the back too doesn't it?

This was before I trimmed away the excess batting...

The circle isn't quite perfect so I decided just to trapunto the star. I don't really want to draw any more attention to that wonky pink circle!!!

Even with just a little invisible stitching to keep the diamonds down, it's starting to look pretty isn't it?

I'm so happy with this even if it's less than perfect. I am so excited just seeing that center in place that I cannot wait to finish this project. Yay!

Friday, January 7, 2011

Shopping for Bright Batiks

Over spent at the quilt store today...but it was fun. :)


Wednesday, January 5, 2011

First Finish for 2011

Yay! I finished something, and it's only January 5th! I hope I'm setting a trend for the rest of the year... ;)

I am actually really happy with how this turned out! I learned quite a bit with this little experiment. First and foremost it's going to take practice to improve, and this has inspired me to get going on some more practice projects asap!!! Also I think that I probably should have used a topstitch needle because the invisible thread is accompanied by lots and lots of holes!!! I tried spraying this with a little water and pinning it to my ironing board to help it lay nice and flat and square, which really seemed to help so I'm going to do that again for sure. It also helped to hide some of those little holes too, so that's a good thing to know.

All in all I think the trapunto turned out really neat, and now I have some ideas for how to improve it's look in my next projects. The McTavishing is looky very McTavishy, so I'm happy with that as well! I think it will be fun to try in different colors of thread too...

My next obsession is now with hand dyes...I am going to try and stock up on a few bolts of cotton for dyeing and dyes to go with it. I'm not sure how safe they are to play with while pregnant and it seems to be an outdoor type of project so I'll save it for after baby comes when the weather gets warmer in June hopefully. I bet the girls will have fun helping me too. :)

Monday, January 3, 2011

Experimenting with Trapunto, McTavishing, and More...

Yesterday I was supposed to be painting and cleaning...but then something happened. I came across this website and found myself unable to move from my computer chair for nearly three hours. All I can say is WOW. If you want to be inspired to the point of immobility check out Patsy Thompsons blog, I literally went through every post all the way back to 2006 when she first began her website. I love my traditional quilts and primitive brown/red/black palette's, but boy oh boy the colors alone in Patsy's quilts will make you salivate and warm you right up on a cold day in January!

Inspired by her quilts and quilting, I drew up this feathery thingy doodad to experiment with. Patsy also posted a few videos on YouTube demonstrating a really easy trapunto technique. It's hard to see the trapunto here, but scroll down and you'll see a few pictures of what I did.

In the above picture and below I closed up on my attempt at McTavishing. I don't know what Karen McTavish would say about this, lol*, she might not even appreciate me attatching her name to my so called "technique", but hey, it's my first shot!!! Lol* I'm using invisible monofiliment thread for the McTavishing and I also used it some in the trapunto around the feather applique.


More of my "McTavishing". Lol*


Here's a little closeup of the trapunto'ed feather...I used more invisible thread and my new Sulky variegated in pink and yellow...

Here's a better view of the feather before I started quilting. This is just the trapunto'ed section. I can see that this is going to take a LOT of practice, but this was fun!

Here's a closeup of the trapunto'ed section from the back...

Sunday, January 2, 2011

More Thread Talk


Seems the same thread favorites keep coming up! Superior/King Tut (King Tut is made by Superior) and Aurifil along with Sulky cotton blendables. The King Tut seems a heavily recurring theme so I think I will have to place an order and try that next.
I also am a huge fan of Connecting Threads Essential Thread. They are by far the most affordable cotton thread I've found with a great selection of colors. My only complaint is they don't keep colors long enough! They no longer carry variegated threads and a lot of their thread sets are phased out to make room for new ones. I would say Coats and Clark is my second go to brand for cotton thread but the color selection isn't as impressive and they are a little more pricey. The thread itself seems a little more sturdy than the Connecting Threads to the touch, even though Connecting Threads and Coats and Clark are both 50 weight mercerized cotton thread intended for machine quilting.
I have read a lot about long arm quilters using Signature polyester cotton blends and I wonder what result one might have with this type of thread on a domestic machine?
Someone asked me in the comments from my last post why I chose rayon for quilting this quilt. My answer to that is, I didn't really go to the store intending on purchasing rayon thread, however, I am definitely up for experimenting. I understand that synthetic threads can deteriorate the cotton in your quilt over time with washing and wear, because the synthetic threads are much stronger than the cotton. My circular geese quilt will likely never be washed, so I'm excited to have an opportunity to experiment with different kinds of thread that I wouldn't normally want to use on a quilt intended for actual use. When I went to JoAnn's all the thread was 50% off and the Sulky Rayon thread offered the best variety of variegated options...I also really like how shiny the rayon thread is and am excited to see what kind of dimension and interest this will add to my finished quilt. I would certainly not choose rayon thread for a typical quilt, but I'm interested in experimenting with embellishments I haven't yet tried before in this project. I may even go the metallic route! What fun! ;)
Thank you for your input and I'd love to hear more thoughts and suggestions!